
Today, many businesses have employees or contractors working from home, overseas, and in the office who access sensitive data that can be accidentally shared to external users. For example, an HR person may accidentally share an employment document with the wrong individual, or an accountant may share credit card or payment information with the wrong party. The good news is that you can implement several security measures to help reduce data leaks, whether accidental or intentional.
According to a research report by Stanford University and Tessian, 88% of all data breaches are caused by human error, including falling susceptible to phishing, sending emails to the wrong recipient and reusing weak passwords.
Data Loss Prevention (DLP) is a key strategy in this effort. But what exactly is DLP, and why is it so important for small businesses? Let’s dive in
What is Data Loss Prevention (DLP)?
Data Loss Prevention (DLP) refers to tools and processes to ensure that sensitive information is not lost, misused, or accessed by unauthorized users. DLP software classifies regulated, confidential, and business-critical data. It identifies violations of policies defined by organizations or within a preconfigured policy pack, typically driven by regulatory compliance such as GDPR, PCI-DSS, or HIPAA.
Why DLP is Crucial for Small Businesses
Protection of Sensitive Data: Law firms and accounting practices handle a plethora of sensitive information, from personal identification information (PII) to financial data. DLP helps in ensuring that this information does not fall into the wrong hands.
Regulatory Compliance: Many industries are governed by stringent data protection regulations. Implementing DLP ensures compliance with these regulations, avoiding hefty fines and legal issues.
Maintaining Client Trust: Clients trust businesses with their sensitive data. A breach can severely damage this trust. DLP helps maintain that trust by demonstrating a commitment to data security.
Preventing Data Breaches: Data breaches can be costly, both financially and in terms of reputation. DLP acts as a barrier to prevent such breaches, safeguarding the business from potential threats.
Implementing DLP in Microsoft 365
Microsoft 365 offers robust DLP capabilities that can be tailored to meet the specific needs of your business. Here’s how you can set it up:

1. Identify Sensitive Information
Before you know what needs to be protected, you must identify what type of data you have, where the date is stored or used, and who has access to the data.
For example, does your business have sensitive information like credit card numbers, social security numbers, and more?
Is sensitive information stored on personal devices or company-owned devices? Personal devices owned by employees should not be allowed to store or download company data without a device management policy.
Conducting a cybersecurity risk assessment is part of this process. Learn more below.
In this article, we will assume most of your sensitive information is stored in Microsoft 365 for email, documents, and cloud storage. We will provide examples of using Microsoft 365 Compliance Center or Purview to protect your data and client information.
NOTE: To use DLP features, your Microsoft 365 must have the appropriate subscription (e.g., Business Premium, E5).
2. Create DLP Policies
DLP policies help you identify, monitor, and automatically protect sensitive information across Microsoft 365. You can create policies from templates or customize them according to your requirements.
3. Set Up Policy Tips
Policy tips are like notifications that alert users when they’re about to share sensitive information. This feature educates employees about data protection policies without hindering productivity.
4. Monitor and Report
Use the DLP reports to monitor activities and ensure policies are followed. These reports provide insights into incidents and help fine-tune DLP policies.
At eSudo, we create DLP policies for credit cards and personally identifiable information (PII) data to block them from getting sent out or shared to outside organization. We also use sensitivity labels or information security protection to allow only authorized individuals to view the data internally. If the data was sent out to someone outside the organization, it prevent them from viewing the data.
How To Set Up a DLP Policy in Microsoft 365
Access the Microsoft 365 Compliance Center:
- Go to the Microsoft 365 Compliance Center.
- Navigate to “Data loss prevention” in the left-hand menu.
Create a New Policy:
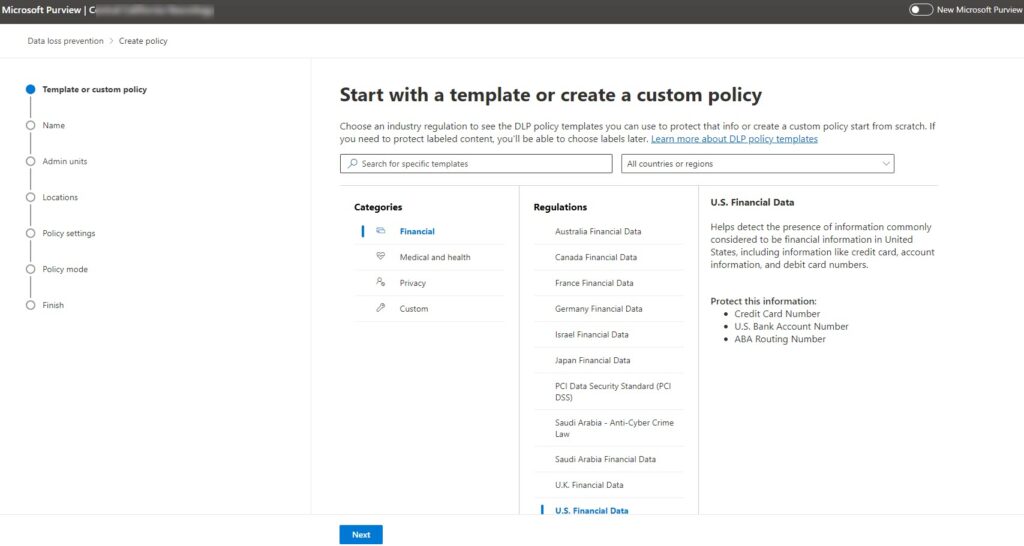
- Click on “Create a policy.”
- Choose a template based on your industry, such as “U.S. Financial Data.”
Customize Policy Settings:
- Define the locations where the policy will be applied (e.g., Exchange email, OneDrive).
- Set the conditions for triggering the policy (e.g., if content contains credit card numbers).
Configure Actions and Notifications:
- Specify the actions to take when a policy match is found (e.g., block access, notify users).
- Set up email notifications and policy tips.
Review and Finalize:
- Review your settings.
- Save and activate the policy.
By following these steps, you can ensure that your DLP policies are effectively protecting your sensitive data.
How Microsoft 365 Sensitivity Labeling Works with DLP Policies
In addition to DLP policies, the Microsoft 365 sensitivity labeling feature, formerly known as Information Rights Management, enhances data protection.
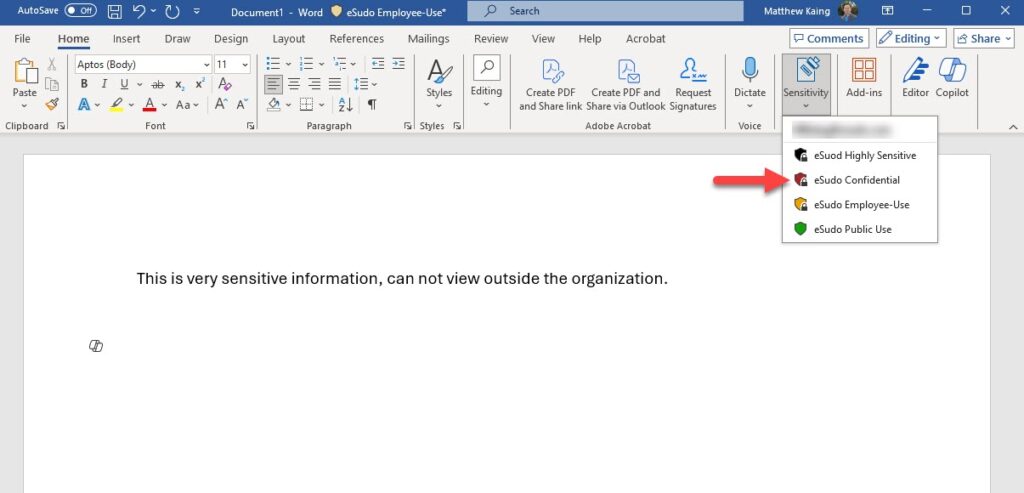
Sensitivity labels in Microsoft 365 classify and protect data based on its sensitivity level. Users can manually apply these labels or have them automatically assigned based on specific criteria. Labels can enforce protection settings like encryption, content marking, and access restrictions.
How Sensitivity Labels Enhance DLP Policies
When integrated, sensitivity labels and DLP policies provide a comprehensive approach to data protection:
-
Enhanced Identification of Sensitive Data: Sensitivity labels help classify data based on its sensitivity level (e.g., Confidential, Highly Confidential). DLP policies can then use these labels to identify which data needs protection and enforce appropriate actions.
-
Consistent Application of Protection: Applying sensitivity labels ensures that all documents and emails classified under a particular label receive the same level of protection, whether it’s encryption or access restrictions. DLP policies can leverage these labels to ensure consistent enforcement across the organization.
-
Automated Enforcement: Sensitivity labels can trigger DLP policies automatically. For example, if a document labeled as “Highly Confidential” is shared externally, a DLP policy can automatically block the action or alert the user.
-
Granular Control: Sensitivity labels allow for more granular control over data protection. You can create DLP policies that apply to specific labels, ensuring that different types of sensitive data are protected according to their unique requirements.
Setting Up Sensitivity Labels with DLP Policies in Microsoft 365
Here’s how to set up and use sensitivity labels in conjunction with DLP policies:
Step 1: Create Sensitivity Labels
Access Microsoft 365 Compliance Center:
- Navigate to the Microsoft 365 Compliance Center.
Create and Configure Labels:
- Go to “Solutions” > “Information protection” > “Labels”.
- Click on “Create a label”.
- Name your label and add a description.
- Configure label settings such as encryption, content marking (e.g., headers, footers, watermarks), and access control.
Publish Labels:
- Publish your labels by creating a label policy. This policy determines which users and groups the labels are available to.
Step 2: Create a DLP Policy Using Sensitivity Labels
Access DLP Policies:
- In the Microsoft 365 Compliance Center, navigate to “Solutions” > “Data loss prevention”.
Create a New Policy:
- Click “Create a policy”.
- Choose to create a custom policy or use a template. For this example, we’ll create a custom policy.
Define Policy Settings:
- Select the locations to which the policy will apply (e.g., Exchange email, SharePoint, OneDrive).
- Add a condition to include sensitivity labels. For example, set the condition to apply the policy to items labeled as “Highly Confidential”.
Configure Actions and Notifications:
- Define the actions that should be taken when a policy match is found. This can include blocking access, sending notifications, or applying encryption.
- Set up user notifications and policy tips to educate users on why certain actions are being taken.
Review and Finalize:
- Review your policy settings.
- Save and activate the policy.
Example: Applying Sensitivity Labels and DLP Policy
Let’s say a law firm wants to protect client documents labeled as “Highly Confidential”:
Create a Sensitivity Label:
- Label: “Highly Confidential”
- Settings: Encrypt documents, restrict access to specific users within the firm, add a watermark saying “Highly Confidential”.
Publish the Label:
- Publish the “Highly Confidential” label to all legal team members.
Create a DLP Policy:
- Locations: Apply to SharePoint, OneDrive, and Exchange email.
- Conditions: If a document is labeled as “Highly Confidential”.
- Actions: Block sharing with external users, send an email notification to the compliance officer, show a policy tip to the user trying to share the document externally.
Integrating sensitivity labeling with DLP policies in Microsoft 365 enhances data protection by providing a layered approach to security. Sensitivity labels help classify and protect data based on its importance, while DLP policies enforce rules to prevent data loss and unauthorized access. Together, they ensure that sensitive information remains secure, compliant, and accessible only to authorized users.
By leveraging these powerful tools, small businesses such as law firms and accounting practices can significantly bolster their data protection strategies, safeguarding their valuable information and maintaining client trust.
If your law firm or accounting practice needs help planning, implementing, and supporting this technology for business, contact us to see how we can keep your IT system running and data secure.
You may also like to take a look at some of these great resources:
- How Can I Protect My Data for My Law Firm Business? – eSudo.com
- Case Study – Why A Law Firm Moved To The Cloud From On-Premises Servers
- Why Is My Organization at Risk?
- Is your law firm’s technology holding you back?
- How a Law Firm Used Cloud to Scale and Work Securely?
- eSudo Blog